This chapter contains the following topics:
If you do not use kits (as specified in Control information), you may skip this chapter.
This chapter explains how to define kit-items
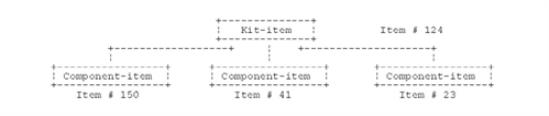
A kit is an inventory item that is constructed from other inventory items. To differentiate between the kit and the items (raw materials) from which a kit is constructed, we refer to the kit as the kit item and the items that are used to construct the kit as component items.
A kit item could be constructed as follows:
The Kits selection is used to specify each of the component items for a kit. Additionally, the quantity of each component item is specified. This quantity is the quantity required to assemble a single kit item.
Before using Kits, both the kit item and the component items must be defined as items using the Items selection. A miscellaneous item may be used as a component item of a kit. Such items would be used to take into account the cost of assembling the kit item, as well as certain overhead costs.
Kits may also be used as components of other kits. You can do this by using the level number which is assigned to each kit when is created. See below:
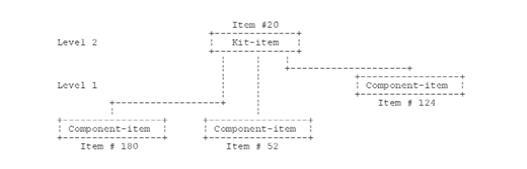
In the above example, kit item #20 is defined as consisting of item #180, item #52, and kit item #124.
In order to allow kit-items to be components of other kits, each kit item is assigned a level number. Whenever a kit item is used as a component of another kit, the level number of the component kit item must be lower than the level number of the kit being constructed.
For example, kit item #20 is defined at level 2 and kit item #124 is defined at level 1.
The Kit selection enables you to do the following:
| • | Enter and maintain kits. |
| • | Print an edit list of kits, or print the kits themselves. |
| • | Copy one kit to another. |
| • | Resequence the kit components. |
A work order (W/O) is a request to assemble a specified quantity of a kit from its component items.
A work order can be immediate, in which case the kit is immediately available for sale. Alternatively, a work order may be printed, issued, and the component items removed from inventory, but the kit is not available for sale until the work order is completed.
The following outline describes how to use work orders to assemble kits. Details for each of the selections used can be found in the appropriate chapters of this manual.
| 1. | Enter a work order to assemble a specified quantity of the kit, using Work orders (Enter). You will be requested for a work in process account, which is used to hold the cost of the kit while it is being assembled. |
| 2. | Commit the required quantity for each component item needed to assemble the kits, using Work orders (Commit inventory). |
|
Note |
If the work order contains a kit item as a component, then the kit item must have been previously assembled using a separate work order. The component kit item will not be assembled as a result of this work order. |
| 3. | Print the work order using Work orders (Print work orders), unless you specified that no printed work order is required in step 1 above. |
Work orders are never printed for immediate work orders because the assembled kit will be available immediately for sale.
| 4. | Issue the work order using Work orders (Issue work orders). Issuing the work order will result in Component usage transactions being generated and placed in Inventory Transactions for each component on the work order. These transactions may be viewed using Inventory or printed along with other inventory transactions on the Inventory Edit List. Component usage transactions remove items from inventory for the purpose of constructing kits. |
If the work order is an immediate work order, then a kit assembly transaction is generated in addition to the component usage transactions. The kit assembly transaction may be viewed using Inventory or printed along with other inventory transactions on the Inventory Edit List. A kit assembly transaction places the quantity assembled of the kit into inventory.
The component usage transactions (and kit assembly transaction, if applicable) will be posted along with other inventory transactions when you post all inventory transactions using Inventory. Each component's inventory account will be credited for the cost of the quantity to be used on the work order. The work in process account that was specified in step one is debited for the same amount. Thus, the work in process account contains the cost of the kit while it is being assembled.
| 5. | The Incomplete Work Orders report can be used to determine work orders that are overdue for completion, or that are coming due in the next few days, week, etc. |
| 6. | When the work order is completed, record this fact using Completed work orders (Enter) selection. |
This step is not applicable to immediate work orders, because they are completed at the time they are originally issued.
| 7. | Close the work order using Completed work orders (Close work orders). Closing a work order will result in a kit assembly transaction being generated and placed in Inventory Transactions. The kit assembly transaction may be viewed using Inventory or printed along with other inventory transactions on the Inventory Edit List. A kit assembly transaction places the quantity assembled of the kit into inventory. |
The kit assembly transaction will be posted along with other inventory transactions when you post all inventory transactions using Inventory. The work in process account will be credited for the cost of the kits assembled and the kit item's inventory account will be debited for the same amount. Therefore, the cost of the kit is transferred from work in process to the correct inventory account.
This step is not applicable to immediate work orders, because they are completed at the time they are originally issued.
| 8. | As needed, a completed work order may be viewed using View (Work order history) or printed using the Work Order History Report. This report shows the costs used for each component and the cost of the assembled kit. |
Refer to the Inventory Transactions chapter for a description of how to disassemble a kit after it has been assembled. Also see the option to dissassemble a kit when processing a quick work order. The Quick Work Orders section of the Work Orders chapter has more information.
With the Enter selection, you can enter new kits, change existing kits, or delete kits no longer in stock. For work orders that are entered already but have not been issued, you may view, (but not change) the components.
Select
Enter from the Kits menu.
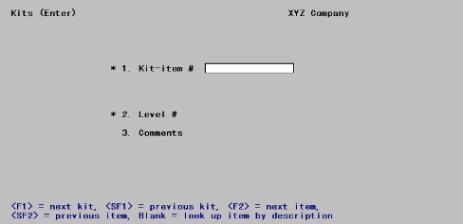
Enter the following information:
*1. Kit-item #
The kit item must already have been defined as an item in the Items selection. It may not be a miscellaneous item, nor may it be described as kit component only.
Options
Enter the item number of the kit-item or use one of the options:
|
<F1> |
For the next kit |
|
<SF1> |
For the previous kit |
|
<F2> |
For the next item |
|
<SF2> |
For the previous item |
|
Blank |
To look up the kit item by its description |
|
Format |
Up to 15 digits |
|
Example |
Enter 1000 |
If you choose to look up the item by description, the cursor moves to the description field. Both the spelling and the capitalization must match the description. Enter the text of the description, or just the leading characters.
Options
You may also use one of the following options:
|
<F2> |
For the next item |
|
<SF2> |
For the previous item |
*2. Level #
Enter the level to be assigned to this kit item.
If you only assemble kit-items from raw materials (i.e., component items that are not themselves defined as kits), then always enter 1 here.
|
Format |
One character |
|
Example |
Type:1 |
3. Comments
Enter any comments about this kit-item. These comments print on the work order, as well as appearing on the kit edit list. They are not seen by the customer, however.
|
Format |
Four lines of 25 characters each |
|
Example |
Type: Reorder point: 20 |
Press <Enter> at Field number to change ? prompt and a second screen displays to enable you to enter information about component-items for the kit. The following screen displays:
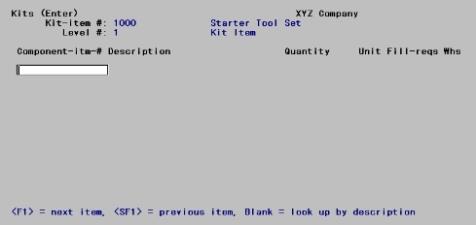
Enter the following information:
Component-item-#
The component item must already have been defined as an item in Items.
The item must already exist in Items.
|
Note |
Miscellaneous items (those beginning with an asterisk) may be included as components in kit-items. You may use them to assign labor charges and overhead costs to a kit-item. |
Options
If component items have already been assigned to this kit, enter the item number of the component item or use one of the following options:
|
<F2> |
To insert a new component item |
|
<F3> |
To delete a component item |
|
<F5> |
To move the component item |
|
<F6> |
For a full description |
If you choose to look up the item by its description, the cursor moves to the description field. Both the spelling and the capitalization must match the description. Enter the text of the description, or just the leading characters.
Options
If you are assigning new components to this kit, you may also use one of the following options:
|
<F1> |
For the next item |
|
<SF1> |
For the previous item |
|
Format |
Up to 15 characters or use the option |
|
Example |
Press <F1>. |
Quantity
Enter the number of component-items required to assemble one kit item. Press <Enter> to default to a quantity of 1.
|
Format |
99999999.99999 |
|
Example |
Press <Enter> for the default |
Unit
The unit for each item is automatically displayed, and no entry is allowed.
Fill Reqs
For miscellaneous items, this field is set to Override and entry is not allowed.
The Fill requirements field enables you to define what you want to happen to a work order for this kit when there is not enough of this component available. Your choices are:
|
F |
Full |
Don't issue a work order for this kit until the full quantity of this component is available. Note that this does not control whether or not inventory will be committed to the work order (this is a separate issue decided at the time the work order is entered). |
| O |
Override |
Issue work order even though quantity is insufficient. Use this option if confident that new inventory will soon be received, since physical assembly of the issued work order is not possible until then. This option should also be used for miscellaneous components (for which there is never any quantity available). |
| S |
Shortage OK |
Assemble the kit even if the full quantity of this component is not available. The shortage is reported in Commit inventory but does not stop the work order from being issued. Use this option for components to be used "while supplies last". |
|
Format |
One letter from the table above |
|
Example |
Type: S |
Whs
If you are not using multiple warehouses, this field is not applicable.
Options
Enter a warehouse code, or use the option:
|
<Enter> |
To designate this warehouse as the “Central” warehouse |
|
<F1> |
To scan through the warehouses |
Use the arrow keys to move up or down to the next line. Press <PgUp> or <PgDn> to move between screens of component-items.
Options
When the cursor is positioned at a component item, you may also use these options:
|
Arrow keys |
For the previous or next line |
|
<PgUp> or |
For the previous or next screen |
|
<Home> or |
For the first or last screen |
|
<F2> |
To insert a component-item between two existing components |
|
<F3> |
To delete the current component |
|
<F5> |
To change the order of components, select the component you want and press <F5>. Use the arrow keys to highlight the place where you want the selected component inserted and press <Enter>. Press <Esc> to cancel the move operation. |
|
<F6> |
To view the full description of this component-item. (Press F6 again to resume entering component-items.) |
The Print selection enables you to print a list of which kits are available. You can also print a list of components for each kit.
Select
Kits from the Reports, Kits menu.
The following screen displays:
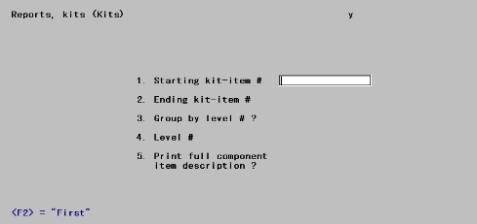
Enter the information as follows:
1. Starting kit-item # and
2. Ending kit-item #
Enter the range of kit-items to include on this report or press <F2> for First and Last. Follow the screen instructions.
|
Format |
Up to 15 digits or use the option |
|
Example |
Press <F2> for each field |
3. Group by level # ?
Answer Y to use the kits' level numbers to group the kits when printing the list.
If you answer N, field number #4 displays (Not applicable).
|
Format |
One letter, Y or N |
|
Example |
Type: N |
4. Level #
Enter a kit-item level number to print the report for only one level, or press <F5> to include All kit levels (the report prints in order first by level number, then by kit-item number).
|
Format |
One digit |
|
Example |
Displays (Not applicable) in this example |
5. Print full component item description ?
Answer Y to print the full description of each component-item.
|
Format |
One character, Y or N |
|
Example |
Type: N |
Use Copy when you want to define a kit that is similar to an existing one. You may copy information from an existing kit-item to make a new kit-item, which you may then modify using Kits (Enter).
The new kit-item must already exist in Items.
Select
Copy from the Kits menu.
The following screen displays:
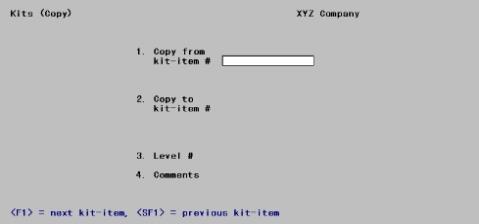
Enter the following information:
1. Copy from kit-item #
Enter the number of the kit-item from which to copy.
Options
You may also use one of the following options:
|
<F1> |
For the next kit item |
|
<SF1> |
For the previous kit item |
|
Format |
Up to 15 digits |
2. Copy to kit-item #
Enter the number of the new kit item.
Options
You may also use one of the following options:
|
<F1> |
For the next kit item |
|
<SF1> |
For the previous kit item |
3. Level #
Enter the level to be assigned to this kit-item, just as in Kits (Enter).
|
Format |
One digit |
4. Comments
Enter any comments about this new kit item.
|
Format |
Four lines of 25 characters each |
The component items are then copied to the new kit item. You may modify the new kit item information using Kits (Enter).
In the event of a system failure, component entries in a kit might become out of sequence. In this case, an error message may appear when you try to modify a kit definition. The error message will refer to this Resequence functions.
To recover from this situation, do the following:
|
Step |
Description |
|
1 |
Run Resequence on the kit-item. |
|
2 |
Print a Kit List showing the kit-item and its component-items. |
|
3 |
Compare it to an earlier list to see whether any component-items are no longer in sequence or are missing. |
|
4 |
Make any needed adjustments to component-items through Kits (Enter). |
Select
Select Resequence from the Kits menu.
A screen appears for you to enter the number of the kit-item to resequence:
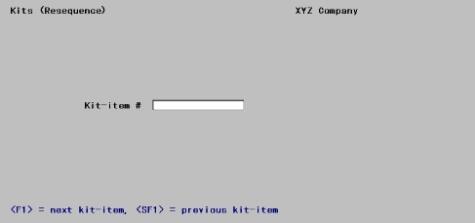
Kit-item #
Enter the number of the kit-item to resequence.
Options
You may also use on of the following options:
|
<F1> |
For the next kit item |
|
<SF1> |
For the previous kit item |
The component-items in the kit-item are then resequenced.
Use <Esc> to return to the first screen.